 EN
EN
 CN - 中國
 TR - Türkiye
 ES - español
 DE - Deutsch
 FR - France
 UZ - O'zbekiston
 TJ - Точикистон
Designing Labels and Barcodes
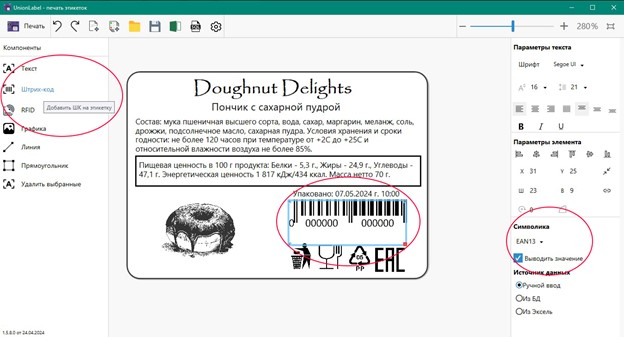
For printing labels with design and vector images, sizes starting from 58*40 are suitable. On a smaller label, the design and text will be hard to read.
- Set the template parameters according to the label size.

- On the component panel, you can select the necessary element, upload an image, add a barcode, specify the product composition, etc.

- The image should be in .png format. It is recommended to choose vector images, preferably in black and white, with clear details to ensure high-quality label printing. Through the "Graphics" component, you can add a logo, product image, various icons, and manipulative signs to the label.

- After uploading the image, you can resize it by dragging the bottom-right corner, set the element parameters, rotate or move the image by holding the left mouse button.

- You can specify the company name and upload its logo on the label, provide a description and composition of the product, formulate wishes for customers, and ask for feedback. Adding text is done through the Component Panel. Using text parameters, you can define the style, size, font, and alignment of the text according to your requirements.

- You can apply graphic elements such as Line and Rectangle to structure the text, highlight key information, or separate the content. You can resize the element by dragging the bottom-right corner. In the opened window, set the line thickness.

- To add a barcode or QR code to the label, follow these steps: on the component panel, select the Barcode, then in the opened window, choose the necessary symbology and adjust the data according to the requirements.
This instruction shows how to manually create a label template. For a detailed instruction on working with variable data from Excel or database sources, see the section Loading Data from Excel or Database Sources.